
Systems Showcase
Renderer
Before b3D, I had not really delved into graphics programming before - only dabbling in Unity ShaderGraph mainly. Going through LearnOpenGL.com was massively helpful!
I was utterly mesmerised by the graphics I first saw by t3ssel8r on YouTube. Absolutely beautiful pixel art of a 3D environment. That’s what I wanted to get towards. Thankfully some other amazing creators demystified some of the techniques:
aathificial has a great video about how pixel perfect, smooth camera motion is achieved
Voyage applies it to 3D, and explains how to achieve the outlines that define the artstyle. They also have many more great videos about the artstyle, like how to achieve the pixel-art tree look.
Dylearn has a few videos going through recreating the t3ssel8r style in Godot.
I hope that if you want to recreate the style, there should be plenty to go through there.
My particular rendering pipeline does some cool things (in my opinion!):
Shadow Atlas
The way to create shadows in 3D rendering is to ‘draw’ the scene from the light’s perspective. Everything the light can see is lit, everything else is in shadow. Store the light’s perspective in a texture and do some vector maths. Great!
To get shadows from multiple light sources, you need to do that for each light source, which can get cumbersome if you create a new texture for each light. Instead, I’m using an atlas texture which is an array texture that contains many of these light perspective textures. The rendering system takes care of assigning each light a place in the atlas, which is used down in the line in drawing the scene and in post processing. This is perfect for directional lights and spot lights, but for point lights that go in all directions, we need a cube map for each light. So there is also an atlas of cube maps!
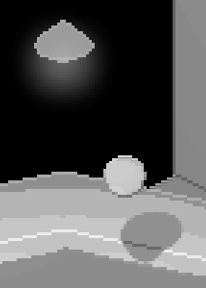
Light-aware Pixel Outlines
So, you can get the outlines of your objects by comparing the depth and the normal vectors of neighbouring pixels. Then, by using the same lighting calculations to work out if the pixel is lit or in shade, you can brighten or darken that pixel for a nice stylised outline. Lit edges shift the object’s colour toward white, and shaded edges towards black. Look at this early development video, paying attention to the control console:
Debug
Using SDL_Log() got me through a lot of troubleshooting, but I found myself needing an automated solution for reporting information that changes each frame. Alt+Tabbing to the console wasn’t cutting it!
I created a pool of entities with UI Text Components. Each frame, they are cleared (t.text = ““), and then whenever a systems calls Debug::Display(myInfo), the Debug system sets pool[0].text = myInfo, and increments a counter. The next time, pool[1].text = newInfo, and so on. If there are ever any more Display() calls than entities in the pool, a new one is created and added to the pool.
The entities in the pool are never destroyed to prevent creating and destroying entities/components each frame, but this also means that a lot of the time there are empty text boxes just hanging out. I think that’s ok!
Another benefit of this is that I can pass different types into Display(), like Display(vec3), or Display(float, 2) if I want to format to 2 decimal places for example. This makes it very easy to quickly get the information I want without having to fiddle with formatting.
Input
Games need input! This is all still work in progress while I continue to develop, but I wanted to make sure that input is configurable (accessibility & player preference is important); each control can be mapped to any key or input device.
That means I need to separate the control from the key. No hardcoded if holding shift, sprint. Instead, if sprintkey held, sprint. Then I can give the player control over which key they want to bind as the key for sprint. Moreover, I can assign controller buttons and joysticks to relevant controls down the line.
struct Mouse {
	bool Interact;
	bool InteractPressed;
	bool InteractReleased;
	bool Rotate;
	bool RotatePressed;
	bool RotateReleased;
	glm::vec2 pos; //Absolute screen position
	glm::vec2 rpos; //Relative position vs last frame
	float sensitivity = 1.0f;
};

struct Key {
	bool Pressed;
	bool PressedThisFrame;
	bool ReleasedThisFrame;
};
namespace Bindings {
	int mInteract = SDL_BUTTON_LMASK;
	int mRotate = SDL_BUTTON_RMASK;

	SDL_Scancode MoveXPositive = SDL_SCANCODE_D;
	SDL_Scancode MoveXNegative = SDL_SCANCODE_A;
	SDL_Scancode MoveYPositive = SDL_SCANCODE_E;
	SDL_Scancode MoveYNegative = SDL_SCANCODE_Q;
	SDL_Scancode MoveZPositive = SDL_SCANCODE_W;
	SDL_Scancode MoveZNegative = SDL_SCANCODE_S;

	SDL_Scancode MoveSprint = SDL_SCANCODE_LSHIFT;

	SDL_Scancode CameraNudgeRight = SDL_SCANCODE_RIGHT;
	SDL_Scancode CameraNudgeLeft = SDL_SCANCODE_LEFT;
	SDL_Scancode CameraNudgeUp = SDL_SCANCODE_UP;
	SDL_Scancode CameraNudgeDown = SDL_SCANCODE_DOWN;

	SDL_Scancode Escape = SDL_SCANCODE_ESCAPE;
}
For each control, I can update the Key based on the keyboard state from SDL_GetKeyboardState(), by accessing the keyboardState array via the relevant binding.
Velocity, Transforms and Relationships
Storing where objects are and how they move is a necessary part of the game engine. Often you want objects to move relative to others. My entities are integers, so how can I implement collections of objects?
Relationship components store the entity ID of a parent, and a vector array of children IDs. Any entities without a relationship component or whose parentID is -1 (not a valid entity ID) is a root, and their transforms’ world position, rotation and scale is the same as their local position, rotation and scale. Then, recursively looping through each child, the child’s world data is their local data + their parents’ world data. If you also update the local transforms of each entity with a velocity component first, you get simple & easy motion.
Animation
As a part of my stylised look, I implemented a “animate on twos” system like is seen in the Spiderverse franchise. While the game is running super smooth at high fps, the animation poses update at a set time interval, configurable by the designer for each animation on each model. For skinned models, world rotation is also stepped at these intervals to maintain the look, while positioning is updated each frame to reduce flickering.
When setting animation states, a blend duration is passed, in which time the model transitions between the animation states while both states progress at their own speed.
Game State
OK, what if I want the game to behave differently at different points? In my main menu, I don’t want the player to move around; in a cutscene, the camera should follow a path; etc.
If we have a game state class, we can call functions on that class to control behaviour. We can also define entry and exit transition functions that are automatically called by the state manager on SetState<state>(). Just keep a currentState unique pointer and call update each frame.
class Gameplay : public State {
public:
	void Enter() override {

	}
	void Update() override {
		Camera::Update(); //Camera Movement
		Movement::Update(); //Player Movement
		if (Input::escape.PressedThisFrame) {
			SetState<Pause>();
		}
	}
	void Exit() override {

	}
};
class Pause : public State {
 public:
	void Enter() override {
		UI::SetVisibility(UI::PauseMenu, true);
		UI::ReturnTo = UI::PauseMenu;
	}
	void Update() override {
		if (Input::escape.PressedThisFrame) {
			SetState<Gameplay>();
		}
	}
	void Exit() override {
		UI::SetVisibility(UI::PauseMenu, false);
	}
};
class MainMenu : public State {
public:
	void Enter() override {
		Renderer::fadevalue = 1;
		Renderer::Fade(0, 1.0f);
		Audio::PostEvent("PlayAmbShip");
		UI::SetVisibility(UI::MainMenu, true);
		UI::ReturnTo = UI::MainMenu;
	}
	void Update() override {

	}
	void Exit() override {
		UI::SetVisibility(UI::MainMenu, false);
	}
};
UI & Text
Using the FreeType library, you can use any font you like. To match the pixel art style of the game, I load my font with a small height (12px), and compare the alpha channel to a threshold. If below, the alpha for that pixel is 0, if above, 1. Some fonts yield better results than others, and some tuning is required, but this way I can pixellate any font!
